Taskhub HMS: User Guide
Check your browser settings
For the best experience with Taskhub, please set your browser's zoom level to around 67%. The recommended screen resolution is 1920 x 1080.
Change Language
By default, the system language is set to English. To change to Spanish Version, click España on the upper right corner of the screen. Click English to return it to the English version.

Staff Module
Upload Staff by Batch: To upload staff by batch, click the "Upload by Batch" button. Select the hotel, department, and employee position from the dropdown menus. Then, choose the file to upload and click "Save."
Add Staff: To add staff, click the Add button to the Staff module.
NOTE: The initial contract date must always be earlier than the employment start date. Available Days can only be ticked if the staff member has permanent days off.
Copy Staff: To add a new staff member with similar details, select the staff profile to duplicate in the Staff module. Then, click on the Copy button.
Edit Staff: To edit a staff profile, go to the Staff module, select the staff member you want to update, and click on the Edit button.
Delete Staff: To delete a staff profile, go to the Staff module, select the staff member you want to remove, and click on the Delete button.
Filter Staff - Status: To filter staff by status, click on the status box and select the desired status from the dropdown menu.
Filter Staff - Department: To filter staff by department, click on the department box and select the desired department from the dropdown menu.
Filter Staff - Position: To filter staff by position, click on the position box and select the desired position from the dropdown menu.
Filter Staff - Type: To filter staff by type, click on the Type box and select the desired type from the dropdown menu.
Search for Staff: To search for a particular staff member, type their name or employee ID into the search bar, then click the Search button.


Purchasing Module
Master Product
Users can add products and set the product category type, unit of measurement, and package contents.
-
To add a master product, click New.
-
Under Category Settings, select the category type and set Category Type to 1.
-
Under Product Settings, enter the Product Name, set Product Type to "a," and set Warranty to 0.
-
Under UOM Settings, select the applicable unit of measurement for the product.
-
For product packages, specify how many items are included within a single product package in the Purchasing Pack Contains field.
-
Set the store conversion rate to 0.
-
Click Save.
Once the master product is added, go to Master Product Details and select the created product to add more details.
Master Product Details
A comprehensive catalog of all purchase items, including essential information such as item name, description, price, and other relevant details. Users must select the product under Master Management to add additional product details, such as unit price, currency, area, country, hotel, and order minimum quantity. Within this module, users can also edit or delete items as needed.
Purchase Draft
In the Purchase Draft module, users can create and save draft purchase orders before finalizing them. This feature allows for review and modifications to ensure accuracy and completeness. Users can add items, adjust quantities, and make any necessary changes before submitting the draft for approval.
Create Purchase Order
-
To create a Purchase Order, click on the New button.
-
Fill in the relevant fields.
-
Select the items to add.
-
Click on Submit.
Approve Center
The Approve Center is the central hub for reviewing and approving purchase orders. Managers and authorized personnel can review draft purchase orders, verify their accuracy, and ensure compliance with budgetary constraints before giving their approval.
Approve/Reject Purchase Request
-
To approve or reject a purchase request, go to the Approve Center.
-
Select the purchase draft.
-
Click on either Approve or Reject.
Purchase Orders
The Purchase Orders module manages all finalized purchase orders. Users can view detailed information about each order, including the order date, items ordered, quantities, prices, and supplier information. This module also allows for tracking the status of orders from creation to fulfillment, ensuring transparency and efficient order management.
Send Purchase Order to Purchasing Department
-
To send purchase orders via email, go to the Purchase Orders module.
-
Select the purchase orders.
-
Click on the Send by Email button.
Note: It is important to provide us with the purchasing email address where the orders will be sent.
Purchase Order History
The Purchase Order History module provides a comprehensive record of all past purchase transactions. Users can search and review previous purchase orders, approvals, and drafts.
MPS New Deduct Category
When creating a purchase order, users can now select a "Deduct Category" to account for discrepancies between the ordered and received items. Items under the Deduct Category have a negative unit cost, allowing users to specify the quantity of products not received. This adjustment helps balance the cost based on the actual received items compared to the initial order.


Configuration Module
Organization Configuration
This is where users can manage organizational settings and details.
Org Chart & Permissions
Users can add and edit departments, update hotel details, add and modify or delete users and departments, and adjust user permissions.
Laundry Configuration
This is where users can add, edit, and delete laundry items.
Upload Laundry Items by Batch: Upload multiple laundry items at once by uploading a file containing the required item details:
-
Go to the Configuration Module.
-
Under the Configuration Tab, click on Laundry.
-
On the right side, click the "Upload by Batch" button.
-
Select the file to upload.
-
Click Submit.

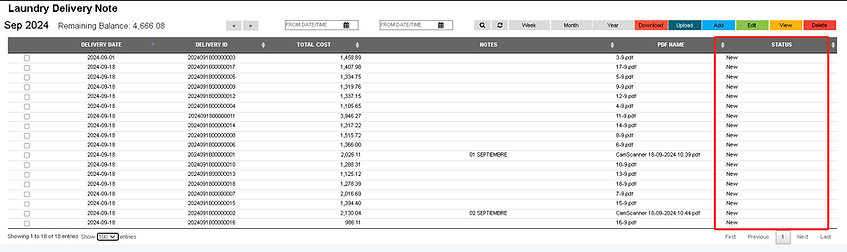
Laundry Delivery Log
View Laundry Notes: View laundry notes by week, month, or year. To check the details of a specific note, select it and click the View button.
Upload Laundry Notes: This feature enables users to upload laundry notes in batches.
-
Upload laundry notes in PDF format by clicking on the Upload button.
-
Select the PDF file.
-
Click the Save button.
-
Wait for the extraction process to complete.
-
Once the processed items are displayed, you can either edit or save the note.
Note: The laundry note PDF must have the same orientation for all pages before uploading, with a file size not exceeding 20MB and no more than 5 pages. It is recommended that the laundry company or third-party provider supply this PDF and upload it using the Vendor Portal or send it via email so that the user can upload it directly.
Add Laundry Notes: To add a laundry note, click on the Add button, fill in the required fields, and then click Save.
Edit Laundry Notes: To edit a laundry note, select the note you want to modify and click the Edit button.
Delete Laundry Notes: To delete a laundry note, select the note(s) you want to remove and click the Delete button.
Laundry Delivery Note Status: This feature lets users track the status of laundry delivery notes uploaded by suppliers through the Vendor Portal. It provides real-time updates, indicating whether a note is New or Completed.
Roster Statistics
View Roster: To view the roster, click on the date field above to select the preferred start date, then click the Search button.
Search by Staff Name and Staff ID: This new feature makes it easier to locate specific staff members within the roster. Users can search the roster by entering either the staff name or staff ID in the search bar at the top of the Roster Module.
Edit Shift: To edit the daily shift of staff, press Ctrl + left-click on the chosen day and then click on Edit. A popup will appear; select the desired shift and click Save.
Upload Leave by Batch: This feature enables users to upload multiple staff leave records at once. Prepare the file with staff leave details, including employee ID, leave type, start date, and end date.
-
Go to the Roster Statistics Module.
-
Click on the Upload Leave by Batch button.
-
Select the file to upload.
-
Click Save.
NOTE: Only certain changes are allowed. Please refer to the matrix below for details.
Print Roster: This feature provides two printing options: Print PDF and Print Excel. Users can export the roster as a PDF or Excel file for local printing. This functionality is available for weekly and monthly views only; printing for a customized date range is not possible.
-
To print the roster, click on the appropriate Print button.
-
The selected file will be downloaded once the process is complete.
Add Leave
-
To add leave, select the staff member who will take the leave by pressing Ctrl + click.
-
Click on the Add Leave button. A popup will appear allowing the user to fill in leave details.
-
Select the type of leave and set the start and end dates.
-
Click Save to add the leave record to the system.
Single Reschedule
For changes made to a particular staff profile, use Single Reschedule to update that staff's schedule without affecting others.
-
Select a username within the roster using Ctrl + click.
-
Then, click the Single Reschedule button for the changes to take effect.


Calendar Module
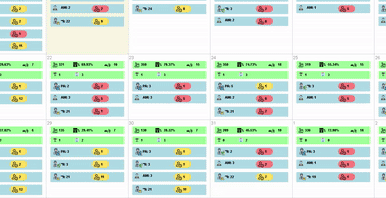
View Calendar: The calendar offers three viewing options: Yearly, Monthly, and Weekly.
Filter Options: You can filter the view using these icons. The icons represent the following roles in this order: Coordinator, Supervisor, Housekeeper, Housekeeping Attendant, Public Area Manager, and Public Area Attendant.
Calendar Reschedule: Instances such as adding or removing a staff member from the pool will require the roster to be rescheduled to reflect the changes and ensure that the new staff is added or removed from the roster accordingly.
NOTE: Rescheduling will affect all future months of the roster. Only reschedule the calendar if an updated occupancy forecast report is uploaded in the system (refer to the Upload Occupancy Forecast Module section).
Add National Holiday
-
To add a National Holiday, click on the Add National Holiday button.
-
Fill in the necessary fields, especially the start and end dates.
-
Click Save.
Create Roster
-
To create a new roster, click on the + icon.
-
Specify the start date, end date, and Average Daily Credits/Rooms.
-
Click Save. The system will then load and create the roster for the indicated period.
Staff Shortage
Red buttons indicate a shortage of a specific type of staff for that day. Users can click on these buttons to open the Staff Shortage Interface.
-
To swap staff schedules, press Ctrl + click on a pair of staff days.
-
Click the Swap button.
-
To change an OFF/FD status to On Duty, press Ctrl + click on the cell to select it.
-
Click the On Duty button.
-
To save changes, click Save.
Staff Surplus
Yellow buttons indicate a specific type of staff surplus for that day. Users can click on these buttons to open the Staff Surplus Interface.
-
Select the staff member you want to assign an off day.
-
Choose the radio button corresponding to the type of leave you want the staff to use. This interface also displays the remaining balance of each leave type for each staff.
-
To save changes, click Activate.
NOTE: The Surplus interface will only display a list of staff who are under the same category.


P&L Dashboard
Labor Cost: Display all KPIs related to labor.
Laundry Cost: Display all KPIs related to Laundry.
Purchasing Cost: Display all KPIs related to Purchasing.
Profit & Loss: Display all KPIs related to Profit & Loss.
Upload Occupancy Reports
Upload Occupancy Report
-
To upload the 'history_forecast' report from your hotel PMS, go to the Upload Occupancy Forecast module and click the Upload button.
-
Choose the file, and then click Save.
Upload Vacancy Report
-
To upload the 'vacant dirty' report, navigate to Room Configuration.
-
Click the Upload Occupancy Forecast button.
-
Click Upload Vac Report.
-
Choose the file, then click Upload.
NOTE: Both files must be in CSV format and generated as DELIMITED DATA from the hotel PMS. You must reschedule the roster every time a new report is uploaded to update the calendar. Users can click (+) on the Calendar, specify the date range, and set the credit per housekeeper.


Holiday Management
Sync Holidays: Go to the Holiday Management Module and click on the Synchronization button to sync the staff holidays. Additionally, in this module, you can view the summary of all staff holiday balances.
NOTE: It is important to note that data auto-synchronization takes at least 1 hour after changes are made. If all leave records start from zero, no setup is needed. However, if there is historical data, you need to configure the initial records beforehand.